Post Care Treatment

REATTACHMENT, HEALING (INCLUDING PHOTOS), TIPS ON STRETCHES, FOODS TO AVOID, EXERCISES TO STRENGTHEN ORAL STRUCTURES, AND PAIN MANAGEMENT

Tongue Tie Reattachment – What Are The Signs And What To Do?
The Importance of Active Wound Management Following Frenotomy
Post-Revision Picture Sequence of Healing Progression for Lip and Tongue Tie Procedures

Tongue-tie Release with Post-op Healing Progression Photos

Maxillary labial and buccal laser frenectomies – Video – Including Post-Op Visits

APPROPRIATE HEALING TONGUE TIE PROGRESSION PHOTOS

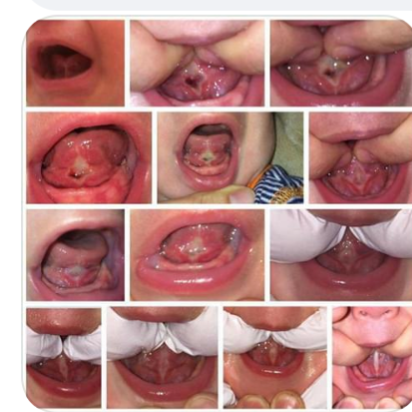
WHAT IS THE TONGUE-TIE RECOVERY AND HEALING PROCESS?

The goal is to heal correctly. Infection after tongue/lip or buccal (cheek) tie surgery is rare. Bleeding is usually light after surgery and usually resolves within a couple of minutes. Providers may request that babies attend their appointment hungry as feeding the baby at the breast or on a bottle immediately after the procedure is by far the most comfortable and effective way of stopping the bleeding.

The action of sucking naturally puts pressure on the wound.  As the wound heals it turns white (sometimes with a yellow/slightly greenish tinge) to form a patch resembling a mouth ulcer and this is normal. In a jaundiced baby, the patch may turn orange due to the raised bilirubin level. The white patch usually develops within 48 hours and disappears within a week to 14 days.

As it heals it can appear to be lifting at the edges and in some babies, the edge can look dark red/orange. This is all part of normal healing.  Some providers place sutures to prevent reattachment of the tissue, and others leave the wound open.  It will depend upon the method used by the doctor. Recovery and healing can take 2-4 weeks.  There is a healing period between 3-4 weeks known as contracture, in which the area will tighten up and you may think it is reattachment. The time frame for reattachment would be a minimum of 6-8 weeks post revision.  

If someone has an open wound, it will look something like a diamond at the beginning. The goal is to facilitate healing by causing the wound to heal slowly, from the outside edges inward, instead of top and bottom healing together.  The top and bottom triangles should not attach to each other. When there is correct healing, the sides of the diamond heal together, creating a new frenum. The goal is that the new frenum is long, lean, and limber allowing for adequate mobility.

The release does not mean immediate progress. It can take 6 weeks to 6 months for a baby to get used to using their new tongue correctly and how to use other muscles now that it is no longer restricted. Just like after any surgery, the area needs healing and therapy to get things working and functioning properly. For example, it may be myofunctional therapy, assistance by an International Board Certified Lactation Consultant (IBCLC), Suck Training for infants, chiropractic or osteopathic care, and more. 

Coconut oil is not recommended as it may promote healing which can cause a more likely chance of reattachment. Consult with your doctor.

Please be aware that it is quite common to feel pain in the teeth, jaw, gums, and other surrounding areas of the mouth after the procedure.  Excessive drooling is completely normal after surgery too. The increased mobility of the tongue and lips may temporarily stimulate salivary flow.

Foods to Avoid Post Surgery

Avoid any foods that are hard to chew and swallow during the recommended recovery period. These include popcorn, taco shells, corn or potato chips, nuts, and crisp crackers. Also, skip rye bread with seeds, dry or coarse whole-grain cereals, and cake and bread with flax seeds or nuts.  High temperature and spicy foods should be avoided as well.


Stretching Exercises: Stretching exercises are to prevent reattachment. Some people do stretching exercises with gloves (latex-free or white cotton gloves).  Cold gloves can be helpful.  Others prefer the option of using just clean bare hands.  See what works best for you.

Pre-Release: Depending on the age of the child or adult, stretching exercises may be necessary with a myofunctional therapist for weeks before the procedure in order to achieve the best possible outcome. Do not skip this pre-release step. 

On the day of the release:  Carefully follow all stretching exercises given by your doctor performing the release and/or myofunctional therapist. Your doctor should provide post-care exercises including visuals and pain management protocol as well as explaining it all in person after the procedure. In general, begin stretches a few hours after the release and do them every 3-4 hours for 4-6 weeks.  Some doctors may require you to do them more often. If given sutures, however, stretching exercises may differ and may not require immediacy so the stitches don’t pop off or pop open the wound. Please consult with your doctor.

Post-Release: After 6 weeks some individuals require stretches 4 times a day then lower to 2-3 times after the 10-week mark. It all depends on each individual case. Your body will try to resort to its old structure. Take the stretches seriously! Your baby may cry when doing exercises post-surgery but remember it is for their benefit.

Stretching Exercises

Stretching Exercises

Stretching exercises are to prevent reattachment. Some people do stretching exercises with gloves (latex-free or white cotton gloves).  Cold gloves can be helpful.  Others prefer the option of using just clean bare hands.  See what works best for you.

Pre-Release: Depending on the age of the child or adult, stretching exercises may be necessary with a myofunctional therapist for weeks before the procedure in order to achieve the best possible outcome. Do not skip this pre-release step. 

On the day of the release:  Carefully follow all stretching exercises given by your doctor performing the release and/or myofunctional therapist. Your doctor should provide post-care exercises including visuals and pain management protocol as well as explaining it all in person after the procedure. In general, begin stretches a few hours after the release and do them every 3-4 hours for 4-6 weeks.  Some doctors may require you to do them more often. If given sutures, however, stretching exercises may differ and may not require immediacy so the stitches don’t pop off or pop open the wound. Please consult with your doctor.

Post-Release: After 6 weeks some individuals require stretches 4 times a day then lower to 2-3 times after the 10-week mark. It all depends on each individual case. Your body will try to resort to its old structure. Take the stretches seriously! Your baby may cry when doing exercises post-surgery but remember it is for their benefit.

Healing After a Tongue Tie Revision:
Helpful tips while doing stretches:
  1. Play relaxing music or sing songs (find ways to ease yourself as well as the baby). Babies do pick up on facial expressions.
  2. Use a headlamp so the baby isn’t looking directly at you. Plus it can give you easier access to find the correct location
  3. Being calm, soothing and praising can be beneficial.
  4. Wear latex-free or cotton gloves to provide a better grip and so the baby doesn’t associate pain with your touch. Cold gloves can be helpful. If you’re not using gloves wash your hands well first. Here is a link for cotton gloves
  5. Make funny faces (kissy faces)
  6. Make silly sounds (monkey sounds)
  7. “Play” in their mouth for a minute or two before doing the stretches. You may want to try practicing the stretches a week before so your child gets used to fingers in their mouth
  8. It may be beneficial to velcro swaddle your baby while performing the stretches
  9. Use dental oral silicone mouth prop bite blocks. These bite blocks or chew sticks can prevent babies from clamping their mouths shut. Bite Blocks
  10. If possible, have another person available to help hold the head so the other person can get their fingers in the mouth for stretches.
  11. Sit on the floor in a straddle position (legs stretched out in front of you)and lay the baby on his/her back between your legs, feet pointing away from you. Pin baby’s arms under your thighs so the arms don’t get in the way.
  12. Make a game out of it: tickle them and rub their face/belly before proceeding and in between stretches
  13. If you have breastmilk you can use gauze to apply it to the wound during and after the stretches.
  14. Tongue Training Guidance with Liper Device
    You can purchases the Liper Device here
  15. Try using the LinguaSTIK device. You can purchase it here
  16. Do stretches before the diaper change and before the feeding so that the baby doesn’t associate pain with feedings.
Tongue Stretch Video by Dr. Ghaheri:
Lip and Tongue Stretches Including Rettachment Pictures and What To Do:
Deeper Stretch After Lip or Tongue-Tie Release to Prevent Reattachment:
Frenectomy Exercises with Melissa Cole of Luna Lactation:
Breastfeeding Challenges: Tongue/lLip Tie Stretches after Frenotomy
Stretching Exercises Following a Tongue and Lip Tie Release
Examples of Some Lip and Tongue Aftercare Manual Exercises for a Toddler/Child
A Full Range of Post Care Exercises for Teens and Adults
Gentle Post-Frenotomy Care and Mouth Work by Melissa Cole, MS, IBCLC of Luna Lactation & Wellness:
Infant Frenectomy – Aftercare Video – Part 1 – Caring for the Baby on the Day of the Procedure:
Infant Frenectomy – Aftercare Video – Part 2 – Massage Exercises – Next Day Onwards:
Infant Frenectomy – Aftercare Video – Part 3 – Suck Retraining:
Infant Suck Training Exercises
Advanced Breastfeeding Care: Oral Exercises Including Gum Tracing, Biting & Suck Training by Lisa Lahey, RN, IBCLC, COMS
Sleeping Tongue Posture Hold
7 Simple Baby Body Work Movements to Relax Your Baby:
Guppy after posterior Tongue Tie Release: Tummy Time Guppy

A form of “reverse tummy time” – it helps with chin and neck extension.   Most babies love it, and it’s especially great after a tongue-tie release procedure.  In this video, it’s shown with the baby on a lap. The guppy can also be done with the baby’s head over the curve of a pillow or laying the baby in the reverse orientation on a “boppy lounger.”

TummyTime!™ Method Head Turning to Non Preferred side
PAIN MANAGEMENT

Please be aware of pain management recalls. Do your research!

STAY AHEAD OF THE PAIN: This means not waiting until your pain is severe before you take your medication. If you wait until your pain is severe or increasing, it will be more difficult to control your pain, especially after the wait for the medication to be absorbed by your body and take effect.

Try a Medi Frida Pacifier Baby Medicine Dispenser

Try Pain Relief Suppositories if will not take orally

Freeze a baby toothbrush as a form of pain relief

Use a Baby Freezable Teether Pacifier

Put water in your soothie pacifier and then place it in the freezer for a couple of hours and use it as a homemade freezable teether pacifier

 Use Popsicle Makers 

Place ice inside a Baby Fruit Feeder Pacifier Teething Teether

Offer the baby a sugar-water mixture (ask your doctor for the appropriate amount)

Babywearing & keeping the baby upright as much as possible so blood does not rush to the wound causing throbbing

Dissolve some arnica in ice water, soak a cotton ball, and put it under the tongue for a minute or however long it is tolerated

Use the fat on top of the breast milk after it has been chilled in the fridge and put that on the affected area

Skin to skin and warm baths (some prefer Epsom salt baths) after stretches. Ask your doctor if Epsom salt baths are appropriate for the age of your child

Options to freeze breast milk:

1) Freeze breast milk on a cookie sheet and break it into pieces

2) Freeze a flat, thin layer of breast milk in a Ziploc bag so it is easy to break off small pieces

3) Place breast milk in an ice tray with a pacifier set on top to be the handle

Comfort nursing – breastfeeding for another purpose besides feeding. It offers opportunities for:

  • relaxation
  • bonding
  • warmth
  • cuddles
  • relief from pain

Natural Remedies for upper lip swelling relief (puffy appearance): Please note for all remedies mentioned please consult with your doctor if the methods are appropriate for your particular situation.  For example, it may not be suggested by your provider to put ice directly on the wound.

  • Try cool/ice cloth compress
  • For nursing babies: little bits of frozen breastmilk or “Breastmilk popsicles” under the lip can help cool down the area

Adults:

Ice pops or ice chips to help ease the pain

Ice compress on the outside of the neck/throat areas

Have cold drinks

Other homeopathic remedies for wound management include serrapeptase pills. These pills are not for swallowing; rather the pill is opened and the powder is applied to the inside of the wound to prevent healing and reattachment.  Please consult with your physician or specialist before using this approach to make sure they are in agreement.